
As a manufacturer specializing in engineered wood flooring, we recognize the significance of making well-informed choices regarding the installation of engineered herringbone flooring.
Herringbone flooring is celebrated for its enduring elegance and resilience, bringing a sense of refinement to any environment.
Yet, before initiating the installation journey, it is vital to carefully weigh several key factors. In this article, we delve into four essential insights that will ensure a successful engineered herringbone flooring installation.
Subfloor Preparation
One of the fundamental aspects of a flawless engineered herringbone flooring installation is proper subfloor preparation.
Engineered herringbone flooring offers versatility in installation, accommodating different subfloor types such as concrete, plywood, or even existing hardwood floors, unlike solid hardwood flooring.
However, it is imperative to ensure that the subfloor is clean, flat, dry, and structurally sound before proceeding with the installation.
Before laying the herringbone flooring, thoroughly inspect the subfloor for any signs of moisture, unevenness, or damage.
Ensure that the moisture content in the substrate is within the allowed tolerance of a maximum of 35% R.H. (2.05% EMC). If moisture levels are higher than recommended, we recommend using a liquid vapor barrier membrane to provide a barrier against excess moisture.
Taking care of these issues in advance will help avoid potential problems down the road, such as warping, buckling, or squeaking. Additionally, consider using a suitable moisture barrier or underlayment to mitigate moisture infiltration and provide added stability to the flooring system.
Acclimatization

Proper acclimatization of the engineered herringbone flooring is paramount to its long-term performance and stability. Engineered wood, composed of multiple layers, including a top veneer of real wood, is susceptible to fluctuations in temperature and humidity.
Failure to acclimate the flooring material to the environment in which it will be installed can result in expansion, contraction, or gaps between the planks.
Before installing the engineered herringbone flooring, it’s essential to let it acclimate to the room’s environment for a period of 48 to 72 hours. Ensure proper ventilation and maintain consistent indoor climate control throughout the acclimatization period and beyond to preserve the integrity of the flooring.
Pattern Layout and Design

The distinctive herringbone pattern lends character and charm to any interior space, but meticulous planning and precision are required to achieve optimal results. Before commencing the installation, carefully consider the layout and design of the herringbone pattern, taking into account the dimensions of the room, the direction of natural light, and architectural features.
Start by establishing a focal point or reference line from which to begin the herringbone pattern. Depending on personal preference and aesthetic considerations, the pattern can be laid diagonally or parallel to the walls.
Take accurate measurements and use chalk lines or layout grids to guide the placement of the herringbone planks, ensuring symmetry and alignment throughout the installation process.
Professional Installation and Finishing

While engineered herringbone wood flooring is designed for ease of installation, seeking professional assistance can ensure a flawless finish and enhance the longevity of the flooring. Experienced installers possess the expertise, tools, and techniques necessary to tackle intricate patterns and overcome challenges associated with irregularities in the subfloor or room layout.
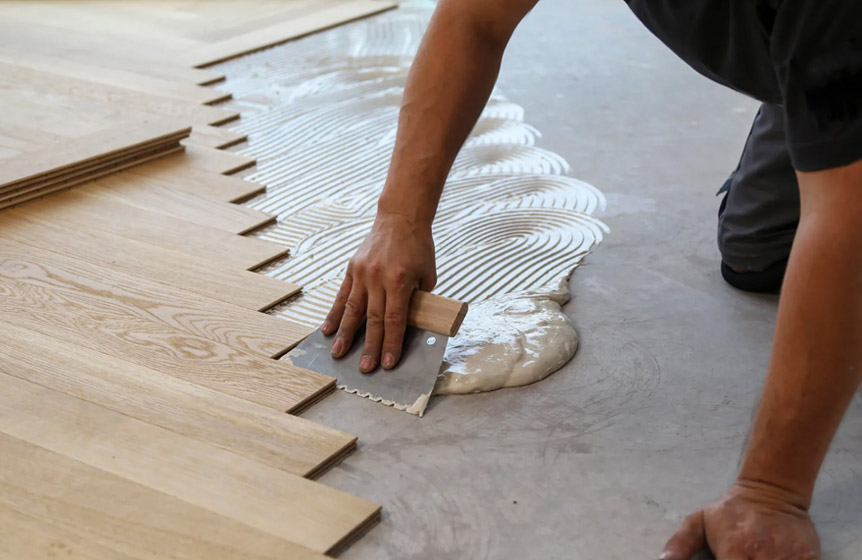
The installation process is generally:
- Apply adhesive to the subfloor as per the instructions.
- Lay the first row of planks along a reference line tightly.
- Use spacers to keep consistent gaps in walls.
- Continue laying rows, interlocking planks, and staggering joints.
- Trim planks to fit around obstacles or edges.
- Press planks firmly into the adhesive, tapping gently if needed.
- Leave gaps around the room’s perimeter for expansion, following the herringbone wood flooring manufacturers‘ recommendations.
- Install skirting boards or trim to cover gaps and finish the edges.
Moreover, professional installation often includes proper adhesive application, precise cutting and fitting of the herringbone planks, and meticulous attention to detail during the finishing stages.
If you need to install engineered herringbone over underfloor heating, you must ensure that the adhesive is suitable for this operation.
For assurance, consider reaching out to both the flooring manufacturer and the underfloor heating installer. Whether opting for glue-down or floating installation methods, entrusting the project to qualified professionals can provide peace of mind and guarantee superior results that withstand the test of time.
Conclusion:
To sum up, the installation of engineered herringbone flooring demands meticulous planning, thorough preparation, and a keen eye for detail. By considering factors such as subfloor preparation, acclimatization, pattern layout, and professional installation, homeowners can achieve stunning and long-lasting results that elevate the aesthetics and value of their living spaces.
As a reputable manufacturer of engineered wood flooring, our dedication lies in offering extensive guidance and top-tier products to facilitate prosperous flooring endeavors. With these essential insights in mind, homeowners can embark on their engineered herringbone flooring installation journey with confidence and assurance.